¶ Motion and Mode Lighting Apps
NOTE: We suggest Room Lighting as a replacement for the Motion and Mode Lighting apps; it contains all features available in these apps and more. However, some users may find Motion and Mode Lighting easier to configure, and it remains available.
Any existing Motion or Mode Lighting instance can be imported into Room Lighting, creating an identical Room Lighting setup — an easy way for existing Motion and Mode Lighting users to try this newer app.
Motion and Mode Lighting Apps offers a quick way to automate your lighting to be triggered by motion sensors or modes. The setup for Motion Lighting and Mode Lighting are slightly different.
¶ Installing Motion Lighting and Mode Lighting apps
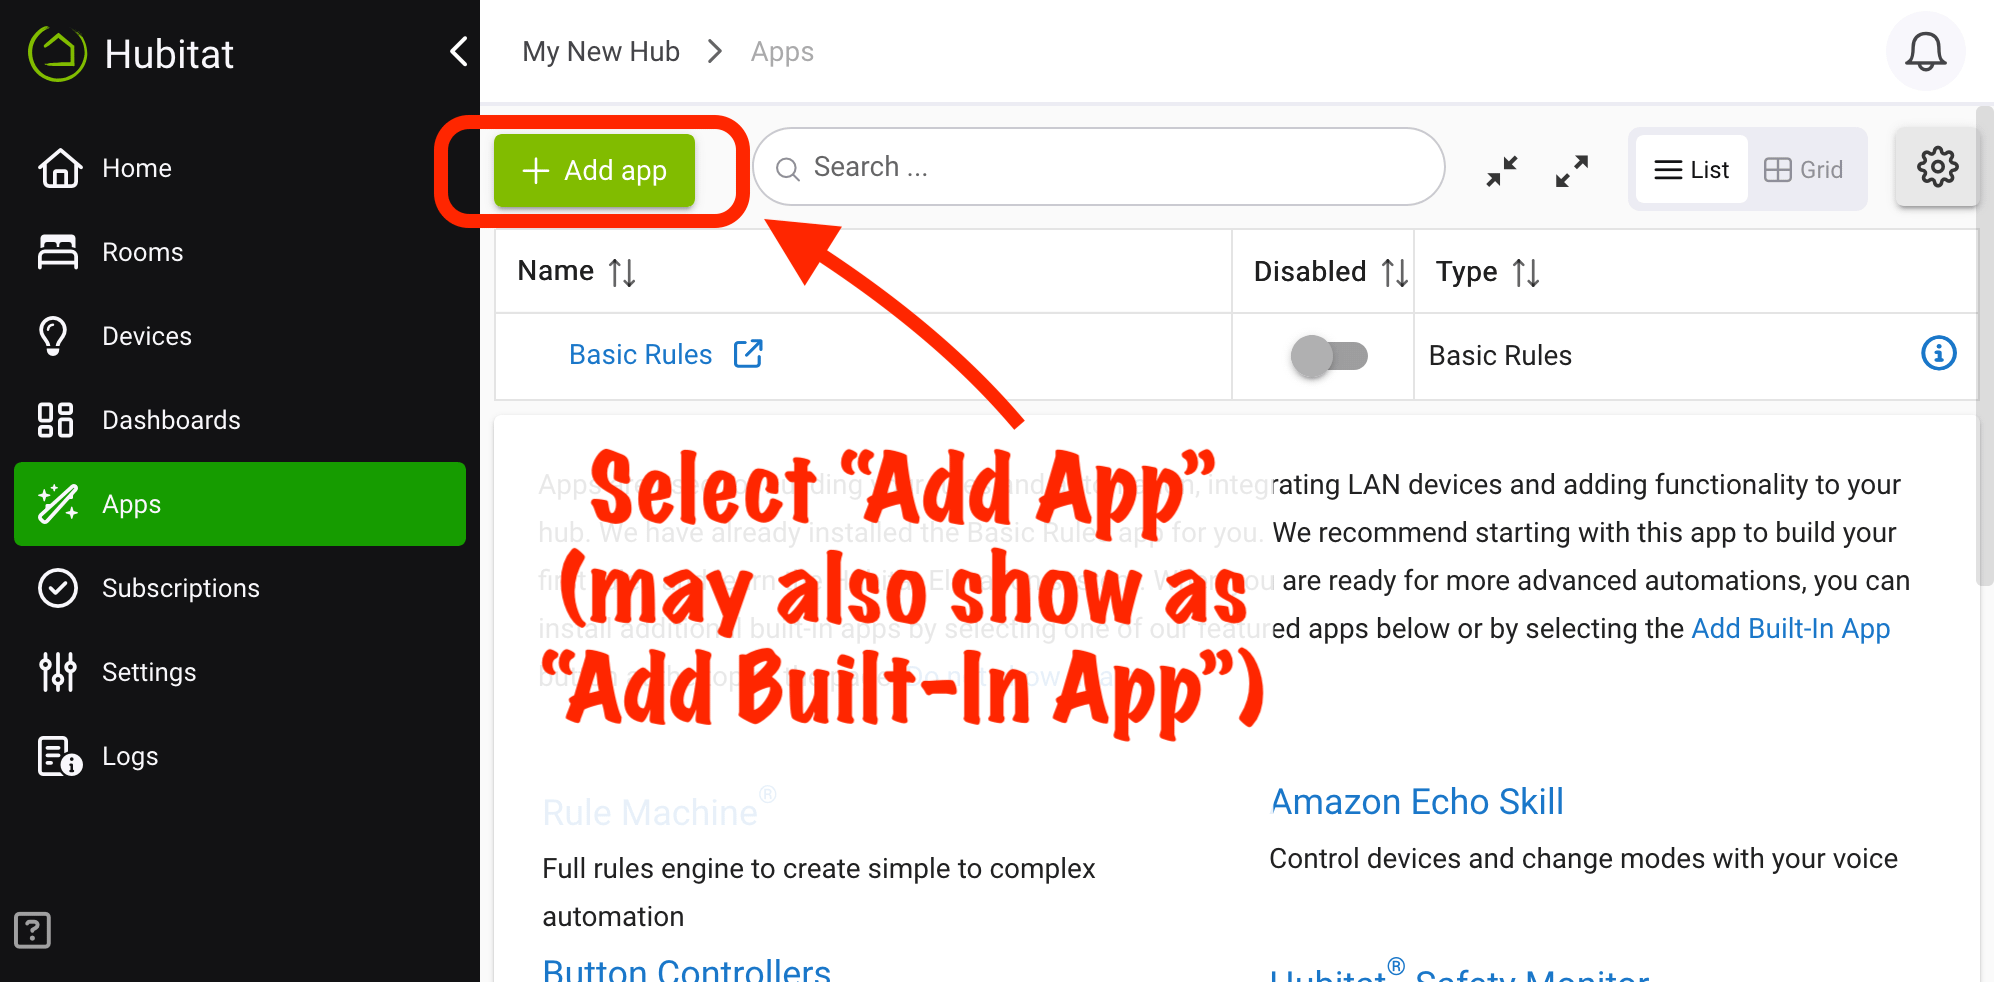
From the sidebar of your hub, select Apps and press the Add Built-In App button.
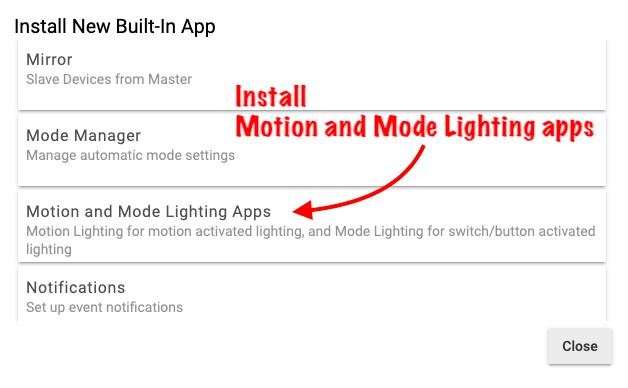
Choose Motion and Mode Lighting Apps from the list of Hubitat Elevation Built-In Apps
¶ Creating a Motion Lighting App
-
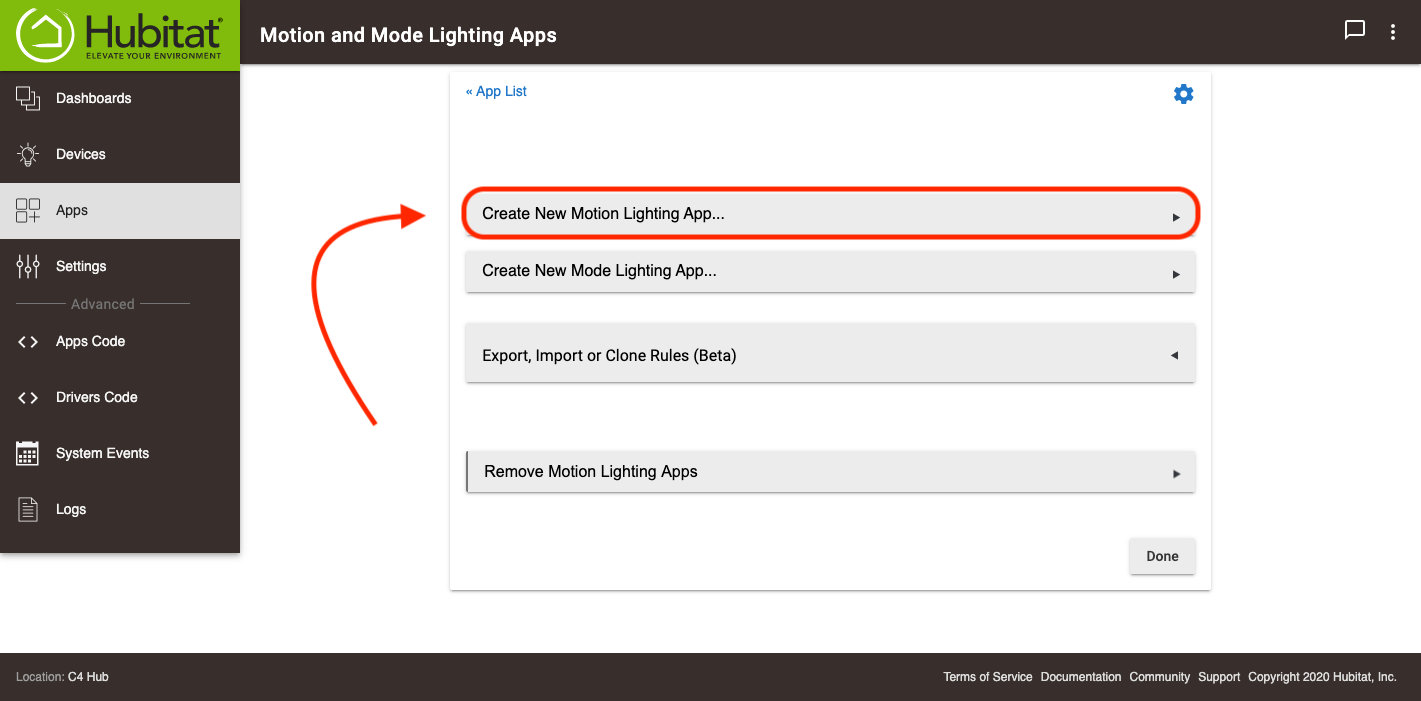
Open the Motion Lighting Apps in your Hubitat Web Interface
-
Select Create New Motion Lighting App...
-
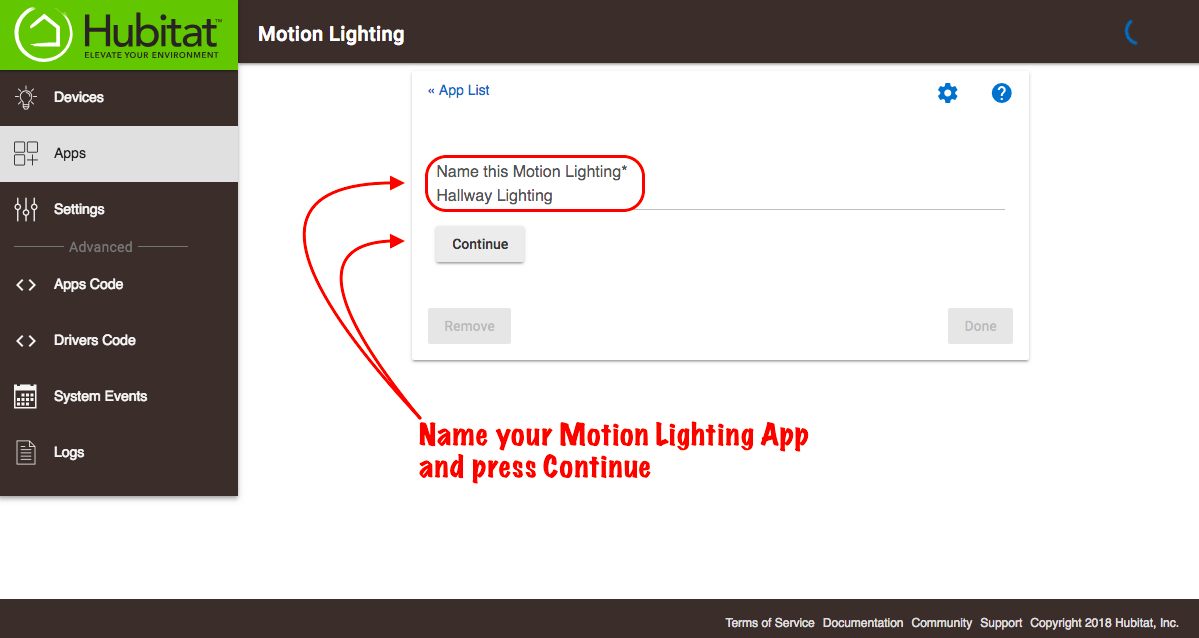
Name your Motion Lighting rule and select Continue
-
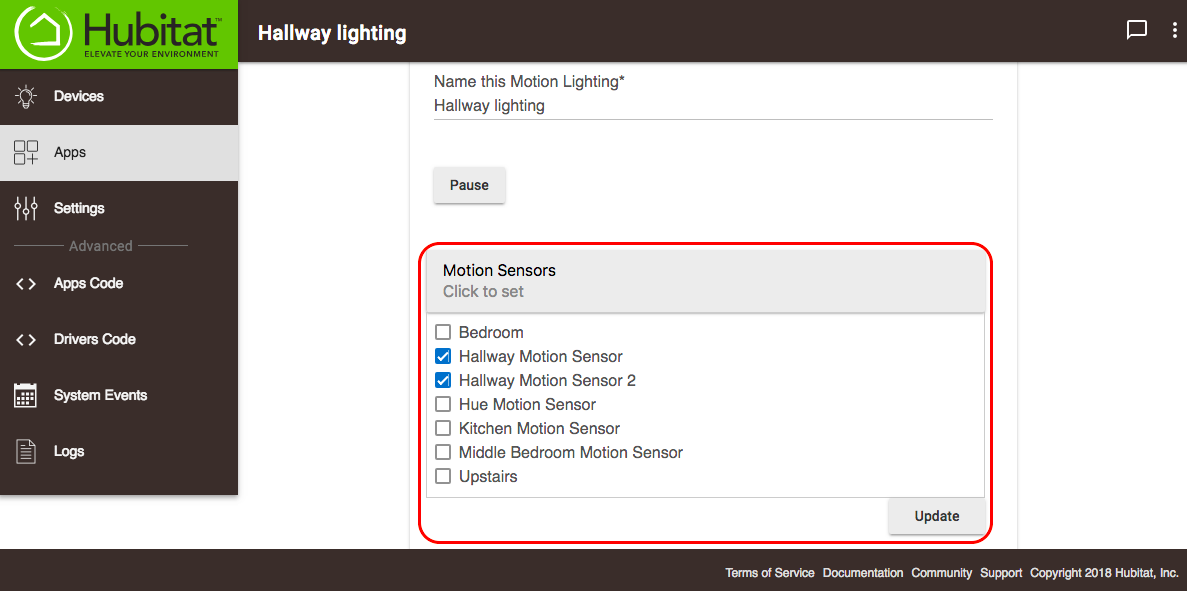
Select Motion Sensors to choose which motion sensors should trigger your lights. Check all that apply and select Update.
-
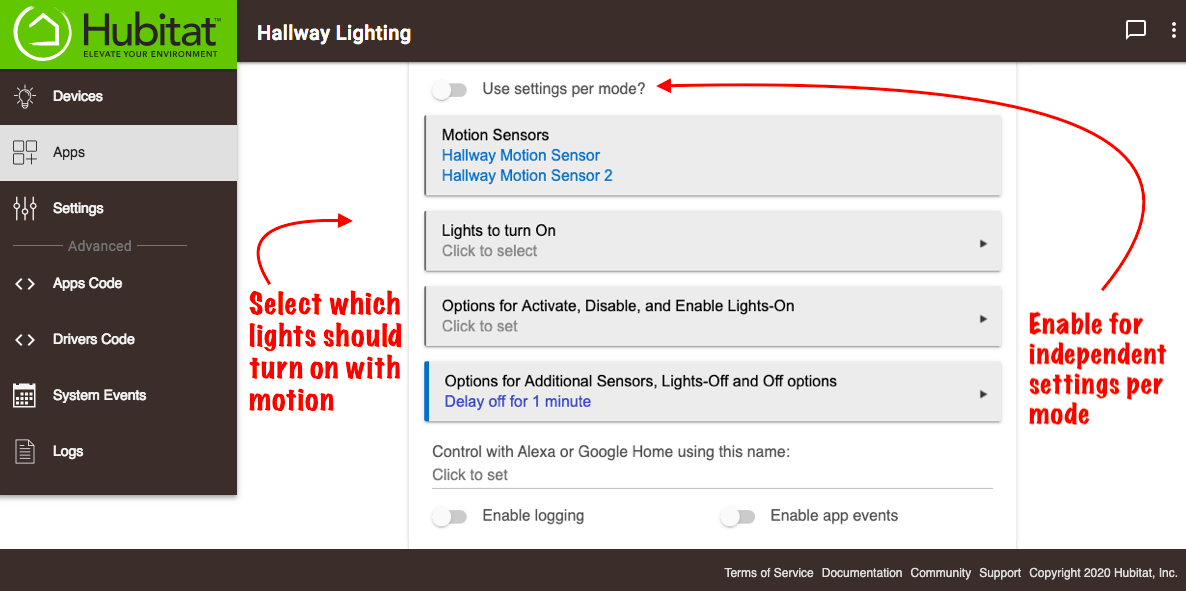
Select the Lights to turn On when motion is detected. If you would like different settings per mode (i.e. Day, Night, Away, etc), enable the Use settings per mode option.
-
You will now have several choices of device types you can turn On with your motion sensors.
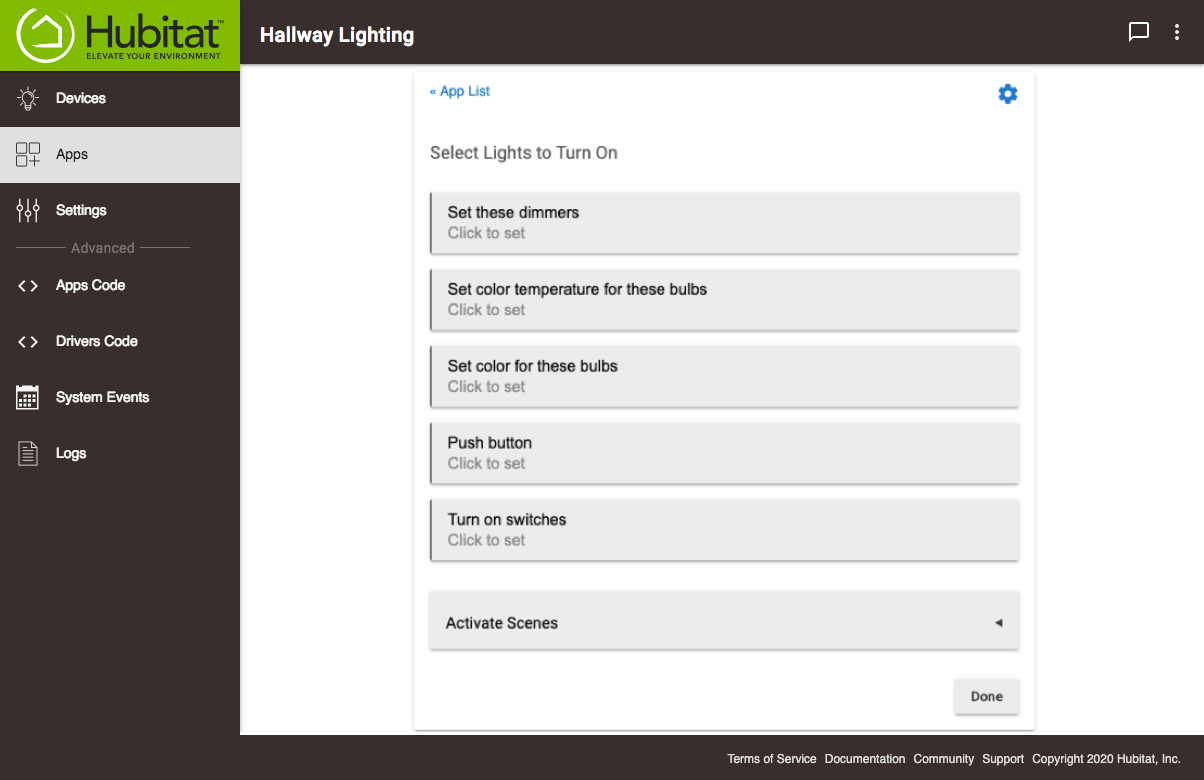
- Set these dimmers: Select the dimmers you want to active. You will also be asked to set the dimmer level.
- Set color temperature for these bulbs: If you have bulbs with variable color temperatures (shades of white), select them here. Choose what color temperature you want them to emit.
- Set color for these bulbs: If you have color-changing bulbs, select them here and what color you want them to be.
- Push button: Choose a button you would also like Motion Lighting to push when motion is activated. This will trigger whatever action you have set for the button in Button Controllers, Rule Machine® or other apps.
- Turn on a switches: Choose which switches you would like to turn On when motion is activated.
- Activate Scenes: Choose the scenes you would like to turn On when motion is activated.
¶ Per-Mode Options
- If you enable the option Use settings per mode?, you will be able to specify which modes will be applicable for Lights to turn On.
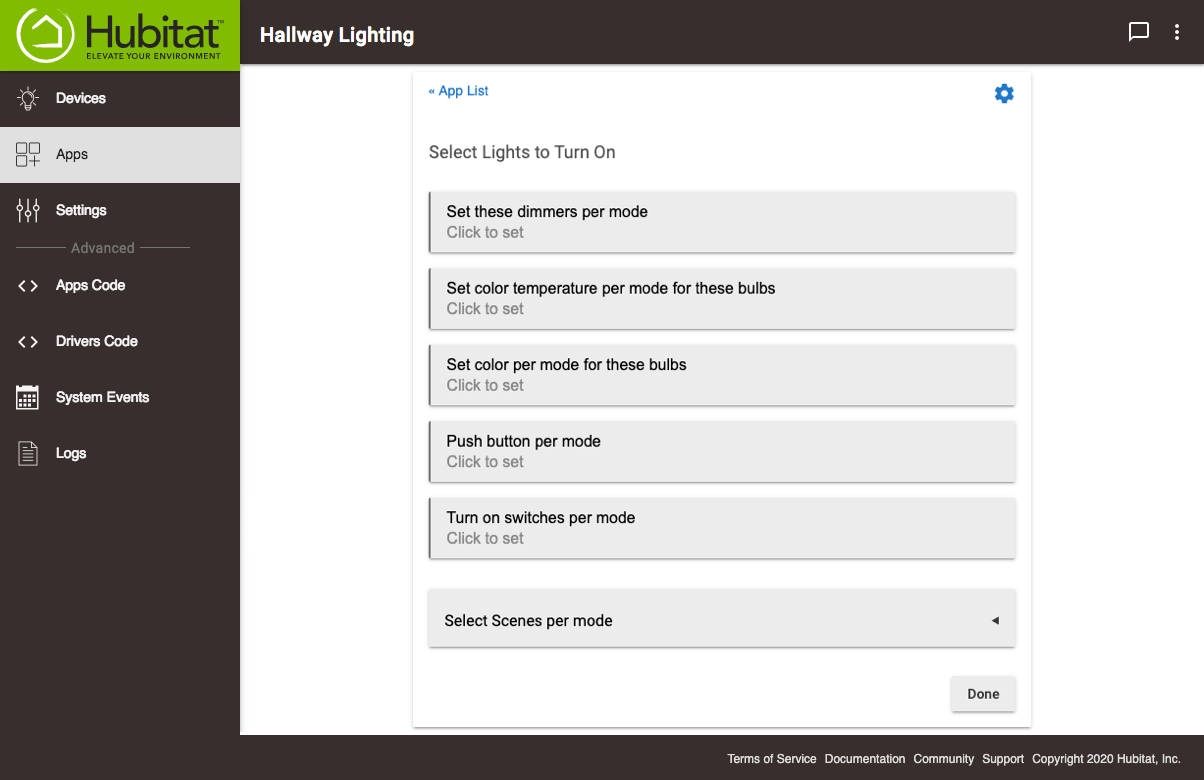
NOTE: Once you select the option for Use settings per mode, the motion lighting rule must now have the modes specified for each device to turn on. If you later decide you do not want to turn lights on per mode, then a new Motion Lighting child app must be created.
- Set these dimmers per mode: Select the dimmers you want to active and for which modes. You will also be asked to set the dimmer level.
- Set color temperature per mode for these bulbs: If you have bulbs with variable color temperatures, select them here. Choose the modes during which they will be active, and what color temperature you want them to display.
- Set color per mode for these bulbs: If you have color-changing bulbs, select them here. Select the modes during which they will be active and what color you want them to be.
- Push button per mode: Select a button you would also like Motion Lighting to push when motion is activated. This will trigger whatever action you have set for the button in Button Controller, Rule Machine® or other apps. Select the modes for which this will be active.
- Turn on a switches per mode: Select which switches you would like to turn On when motion is activated and select the modes for which the switches will be active.
- Select Scenes per mode: Select the scenes you would like to turn On when motion is activated. You can select a different scene for each mode.
- When finished setting up your Motion Lighting app, select the Done button.
¶ Setting Options for Activate, Disable, and Enable Lights-On
You have now created a functional motion lighting child app, with a motion trigger and some lights. If you want to add some additional options, choose Options for Activate, Disable, and Enable Lights-On.
- You will be presented with a list of options and may select as many as you want, leaving any options you don't want blank.
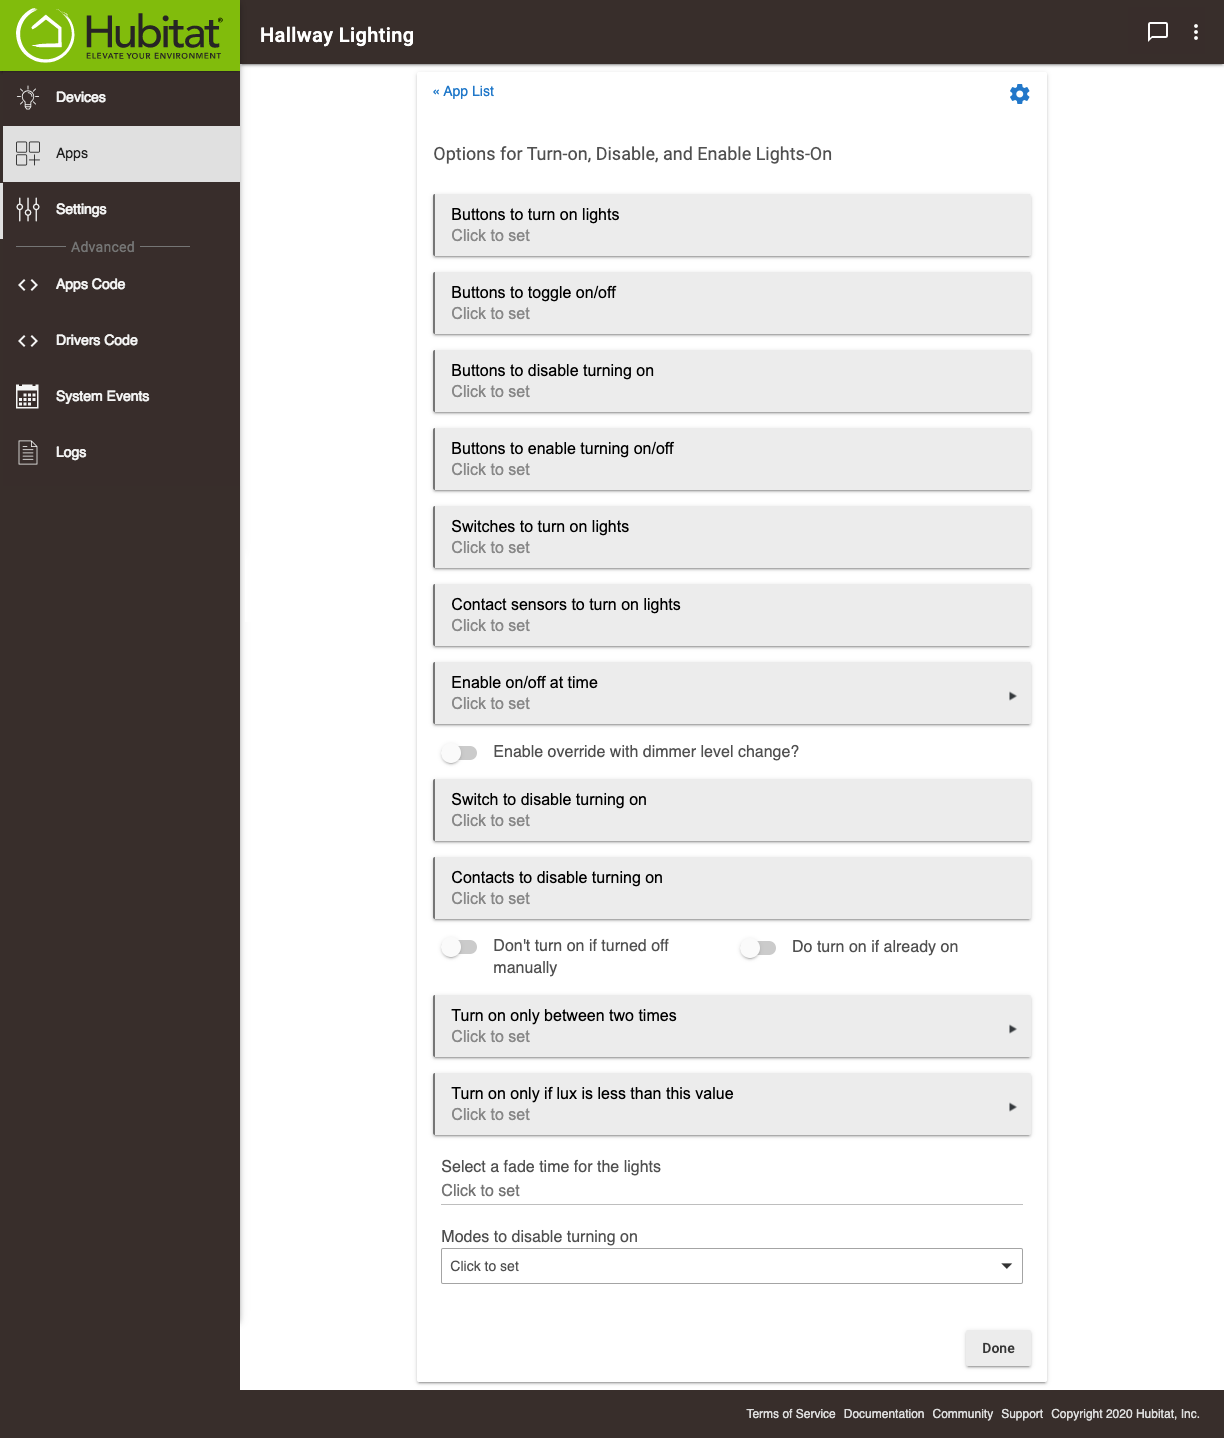
- Buttons to turn on lights: Select any buttons you'd like to use to manually turn On your specified lights. Enter the button number into the field (enter "1" if the controller only has one button). If you only define a button to turn On the light, turning the light Off will be handled solely by motion sensor activity.
- Buttons to toggle on/off: Select any buttons you'd like to use to manually toggle the lights On and Off. Enter the button number into the field (enter "1" if the controller only has one button).
- Buttons to disable turning on: Select any buttons you'd like to use to disable this motion lighting child app and prevent the lights from turning On with motion when pressed. This is helpful to prevent lights from turning on in a bedroom, for example. Enter the button number into the field (enter "1" if the controller only has one button).
- Button to enable turning on/off: If you selected a button to disable the child app, you can re-enable it with a different button. This is different from Buttons to toggle on/off, which simple toggles the light On or Off without affecting the motion sensor input. Defining a button here will allow the motion lighting child app to once again respond to your defined motion sensor(s). Enter the button number into the field (enter "1" if the controller only has one button).
- Switches to turn on lights: Select any switches you'd like to use to manually turn on your specified lights. If you only define switches to turn On the light, turning the light Off will be handled solely by motion sensor activity.
- Contact sensors to turn on lights: Select any contact sensors you'd like to use to turn On your specified lights. If you only define contact sensors to turn On the light, turning the light Off will be handled solely by motion sensor activity.
- Enable on/off at Time: If you use a button, switch or contact sensor to manually disable your motion lighting child app, you can use this option to automatically re-enable at sunrise, sunset or a specific time. This option does not turn your lights On immediately, it merely re-enables the motion lighting child app at a specified time, so it will once again respond to motion.
- Enable override with dimmer level change (default is disabled): Turn on this option if you want to be able to manually set lights low or bright, without the motion lighting settings overriding your manual dimmer setting when motion is detected. NOTE: When this option enabled alone, it will prevent a motion inactive from turning the lights Off and stop additional motion active events from changing the dimmer level if you manually adjusted it.

- Override for level only? (Will still turn off): If this option is enabled, motion active events will not change your manual dimmer level settings, but when no motion is detected, the lights will still turn Off when the specified time has elapsed.
- Use physical level change for override? (Default is any level change): Enable this option for restricting level change override to physical dimmer changes only. Some smart dimmers may also report as they ramp up, thus causing an override and preventing a motion sensor from turning lights off. Selecting Use physical level change for override can prevent this from occurring.
- Switch to disable turning on: Select any switches you'd like to use to disable this child app so lights will not turn On when the specified switches are on, even if motion is detected.
- Contacts to disable turning on: Select any contact sensors you'd like to use to disable this child app so lights will not turn On when the specified contacts active, even if motion is detected.
- Don't turn on if turned off manually: When enabled, the motion sensor will not turn the light On until the switch is turned on again manually. This will prevent the motion sensor from turning lights immediately On again in situations where, after manually turning lights off via a button, switch or contact sensor, your movement may activate a motion sensor before you have the chance to leave a room.
- Clear this on next mode change: When enabled, will allow the lights to be turned on with motion again after the next mode change, even if the previous option ("Don't turn on if turned off manually") is selected and the lights are turned off manually.
- Do turn on even if any already on: Motion Lighting subscribes to events from lights it controls and attempts to determine the current state of all the lights it is controlling with a particular Motion Lighting child app. Certain circumstances may cause Motion Lighting to not turn lights On if it falsely has determined they are already on, due to influence from another app, controls on a remote bridge, or physical control that may have caused the reported state to be out of sync with all of the lights it is controlling. Enabling this option forces motion events to send On commands, irrespective of the state of the lights it is controlling.
- Turn on only between two times: Select a window of time when you would like your motion lighting child app to be active.
- Turn on only if lux is less than this value: Select a lux sensor and select a value (1-10000). The lights will only turn On if the lux value is below this level.
- Select a fade time for the lights: Enter a fade time for your dimmers if supported by the device.
- Modes to disable turning on: Select the mode(s) which, when active, will not allow the lights to turn on.
- When you are satisfied with your chosen options, select Done*.*
¶ Options for Additional Sensors, Lights-Off and Off options
Now that you have your options for On selected, let's turn our attention to the Off options. If you want to add some additional options, choose Options for Additional Sensors, Lights-Off and Off options.
- Again, we are presented with a series of options for controlling when the motion-activated lights will turn Off.
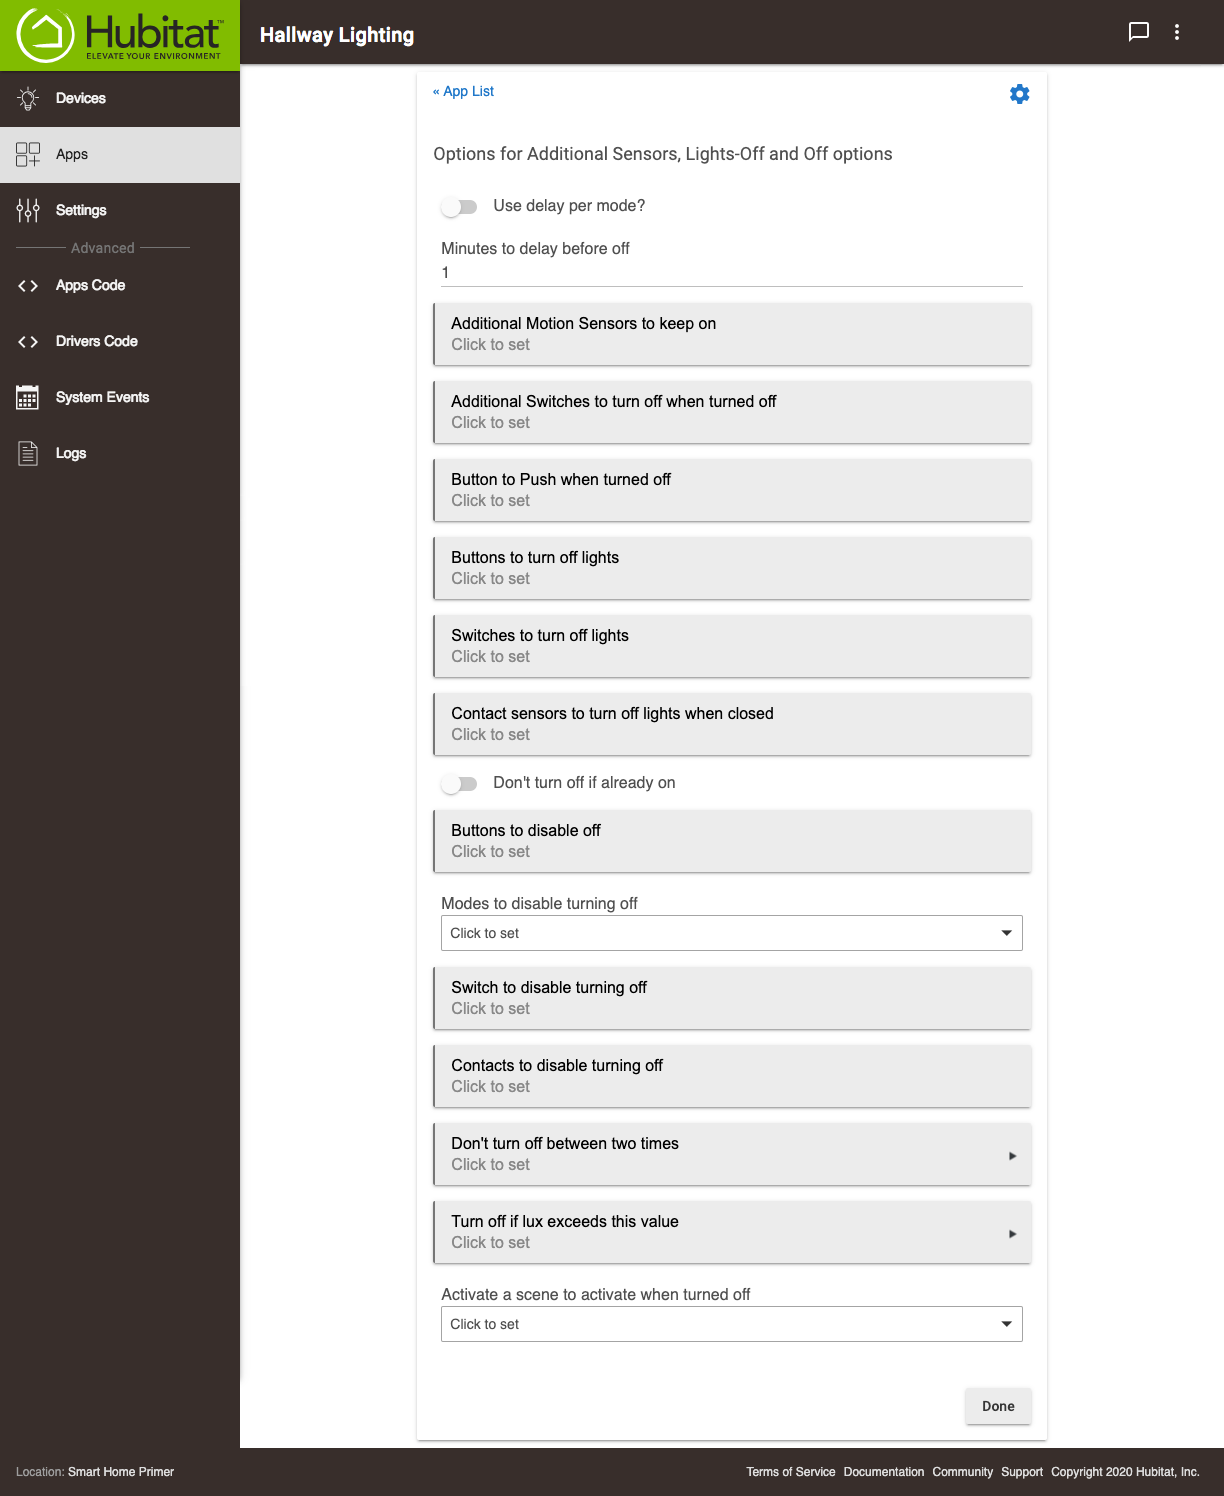
- Use delay per mode: By default, your lights will turn Off whenever motion stops being detected. To avoid this, you can set a delay after the last motion is detected, and before the lights turn Off. Toggle the Use delay per mode switch at the top. Off delay fields will appear for each mode you have selected. Enter the number of minutes you want to delay the lights turning Off.
- Minutes to delay before off (default is 1 minute): Set the number of minutes following the last motion sensed, for which you would like to delay the Off state.
- Additional Motion Sensors to keep on: Selecting motion sensors in this section will not trigger the lights to turn On, but if the lights have been triggered by the primary selected sensor, they will stay On as long as this sensor is active. (Example: You can put a sensor in the shower that will not trigger the bathroom lights to turn On, but will ensure they will remain On as long as someone is in the shower).
- Additional Switches to turn off when turned off: Select any switches that are not already included in your setup, and you would like these switches to automatically turn Off when motion becomes inactive. For example, these might be switches that you always manually turn On, such as a bathroom exhaust fan, but you want it to always turn Off when motion stops.
- Button to Push when turned off: Select any buttons you would like to be automatically pushed when motion becomes inactive.
- Buttons to turn off lights: Select the buttons you wish to use to manually turn Off lights, rather than waiting for motion inactive and delay before Off.
- Switches to turn off lights: Select any switches you wish to use to manually turn Off lights, rather than waiting for motion inactive and delay before Off.
- Contact sensors to turn off lights when closed**: Select any contact sensors you wish to turn Off lights, rather than waiting for motion inactive and delay before Off.
- Don't turn off if already on: Enabling this option will force any light that was already On before motion began, to not turn Off when the motion stops.
- Buttons to disable off: Select a button that will override any Off automations and keep your motion lights on*,* even if motion stops.
- Modes to disable Turning off: Select the modes during which your lights will not turn Off even when motion stops. Your motion lights will still turn on during these modes (unless you disable them in the previous section).
- Switch to disable off: Select a switch that will override any Off automations and keep your motion lights on*,* even if motion stops.
- Contacts to disable off: Select a contact sensor that will override any Off automations and keep your motion lights on*,* even if motion stops.
- Don't turn off between two times: Select a window of time when you would like your motion lighting child app to be inactive.
- Turn off if lux is exceeds this value: Select a lux sensor and select a value (1-10000). The lights will turn Off if the lux value is above this level.
- Activate a scene to activate when turned off: Select the scenes you would like to activate when when lights are turned Off by a contact, switch or inactive motion event. Depending on what your scene does, you may need to utilize the Do turn on if already on option found under Options for Turn-on, Disable and Enable Lights-On. For example, if your scene activated by turning lights Off puts the controlled lights into a dim setting, they are still determined to be On. By also enabling Do turn on if already on, motion lighting would then be able to brighten them upon a motion event.
NOTE: If you are using Motion Lighting to turn lights On and a switch to turn them On, you will need to have the switch itself selected in Options for lights off. If you don't, and you turn your lights off outside of your Motion Lighting child app, then it won't know you did that. It will continue to register them as On, and won't turn them on again from new motion before the timer to turn them Off runs out. This includes turning lights Off via Amazon Alexa or Google Home. You need to specify the same switch Alexa or Google Assistant is using to turn the light Off in the Options for lights off.
- When you are satisfied with your Motion Lighting app, select Done.
¶ Other options
- Control with Alexa or Google Home using this name: You can also specify a name you wish to use for control of these lights using Amazon Alexa or Google Home. Select a name that is clear and easy for your voice assistant to understand.
¶ Creating a Mode Lighting App
Mode Lighting is used in situations where you would like lights controlled by switches to be automatically adjusted to different dim levels based on mode changes.
- Open the Motion Lighting Apps in sidebar of your hub.
- Select Create New Motion Lighting App...
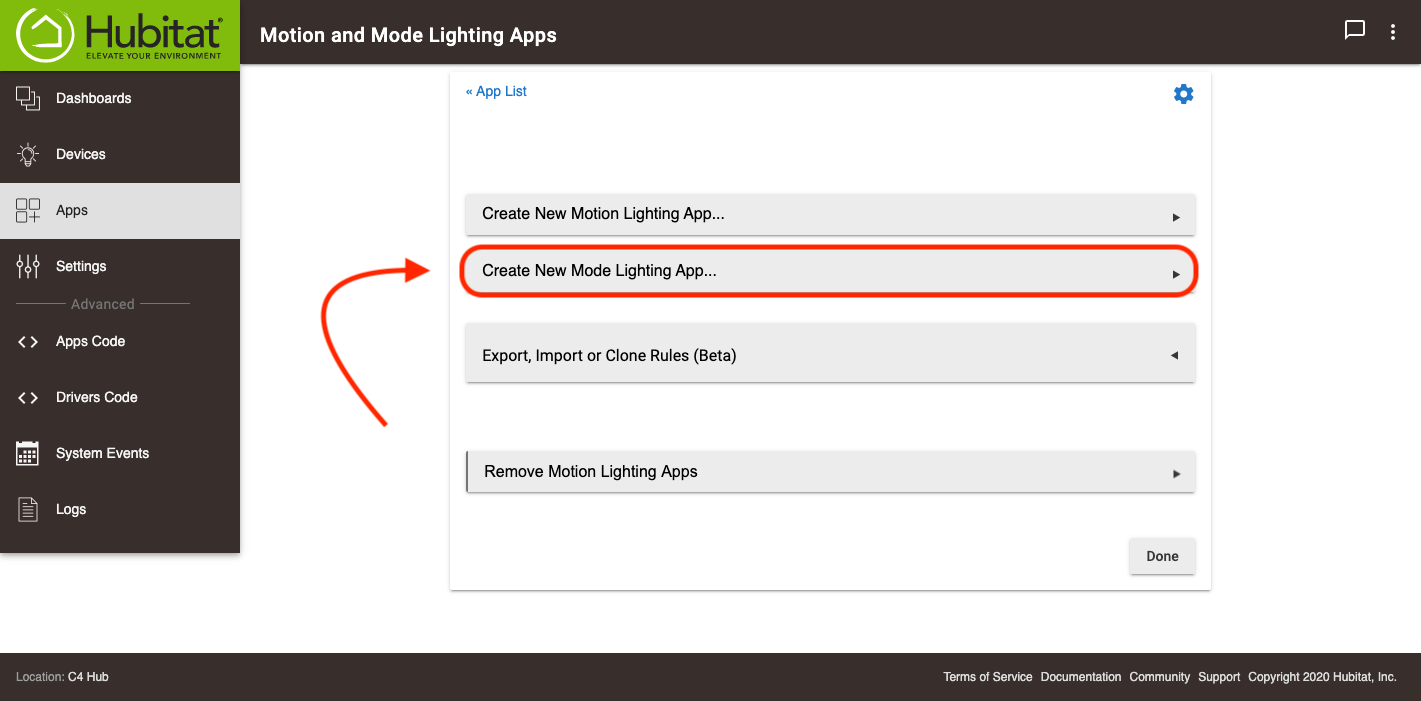
- Name your Mode Lighting app.
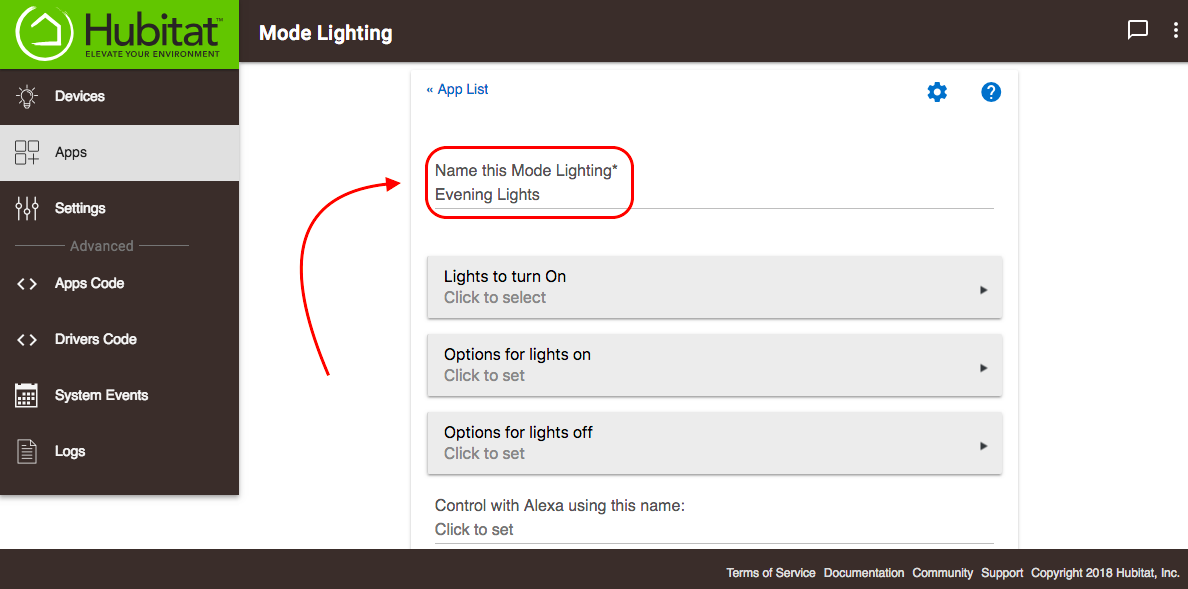
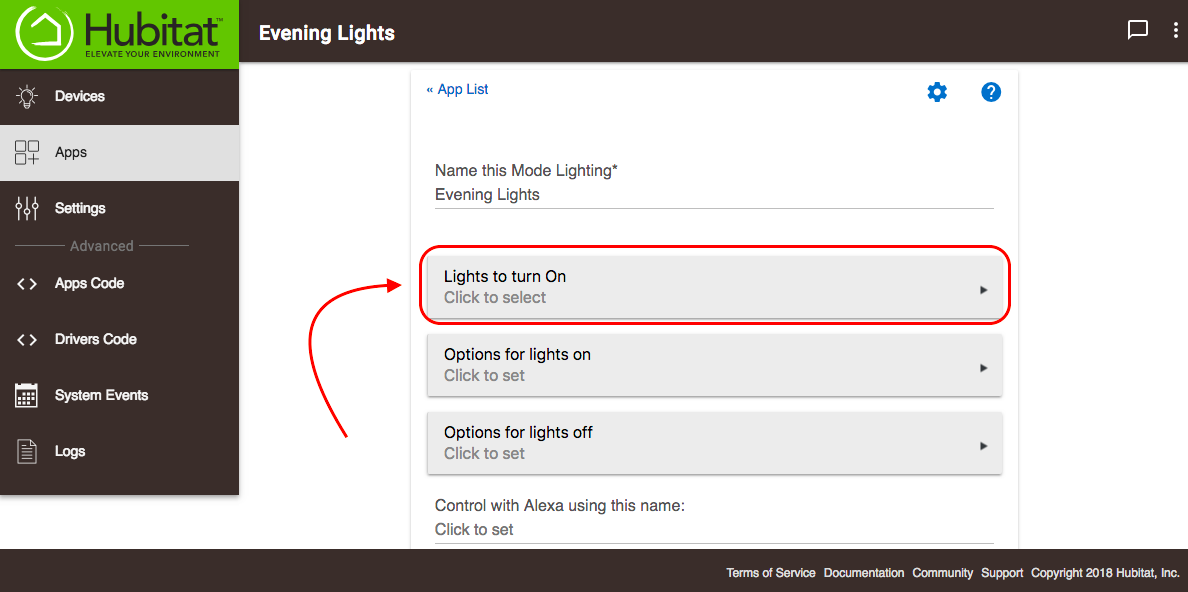
- Select Lights to turn On to choose lights you want controlled by mode changes.
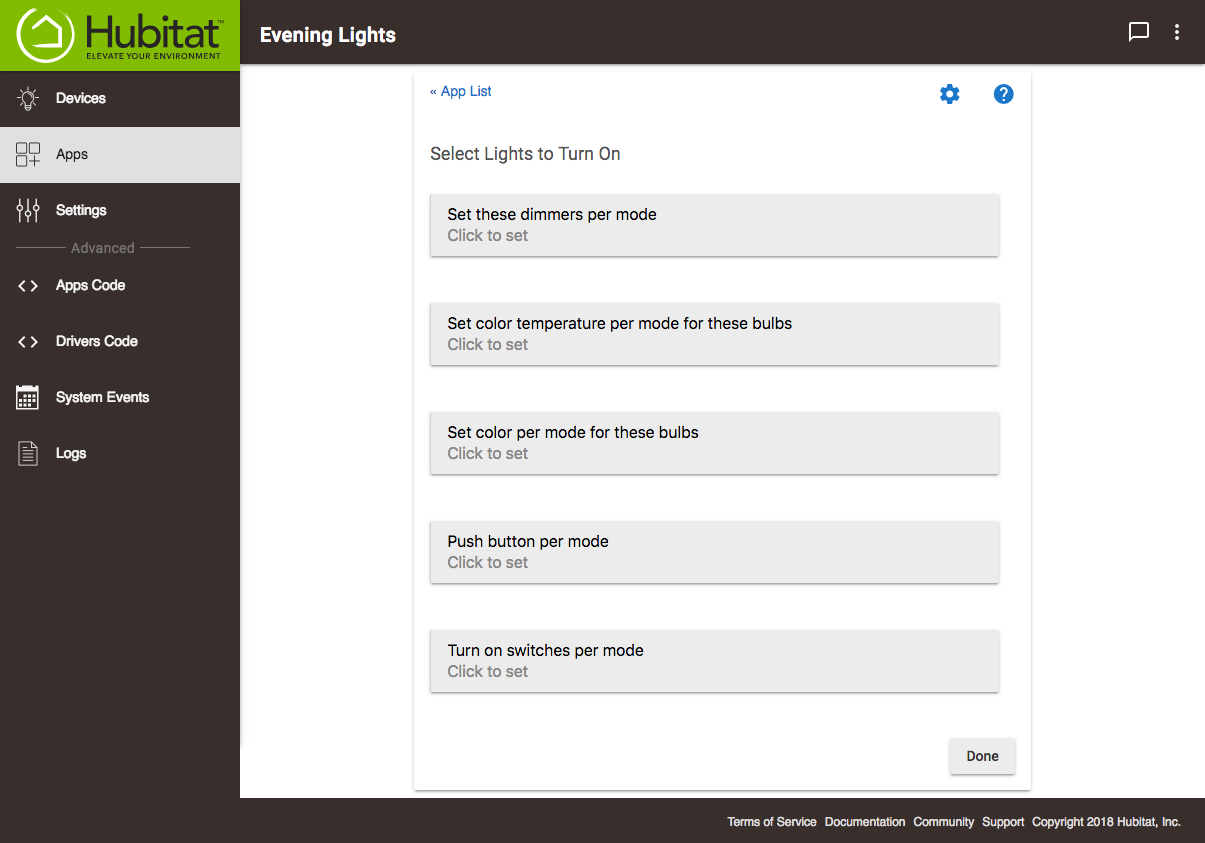
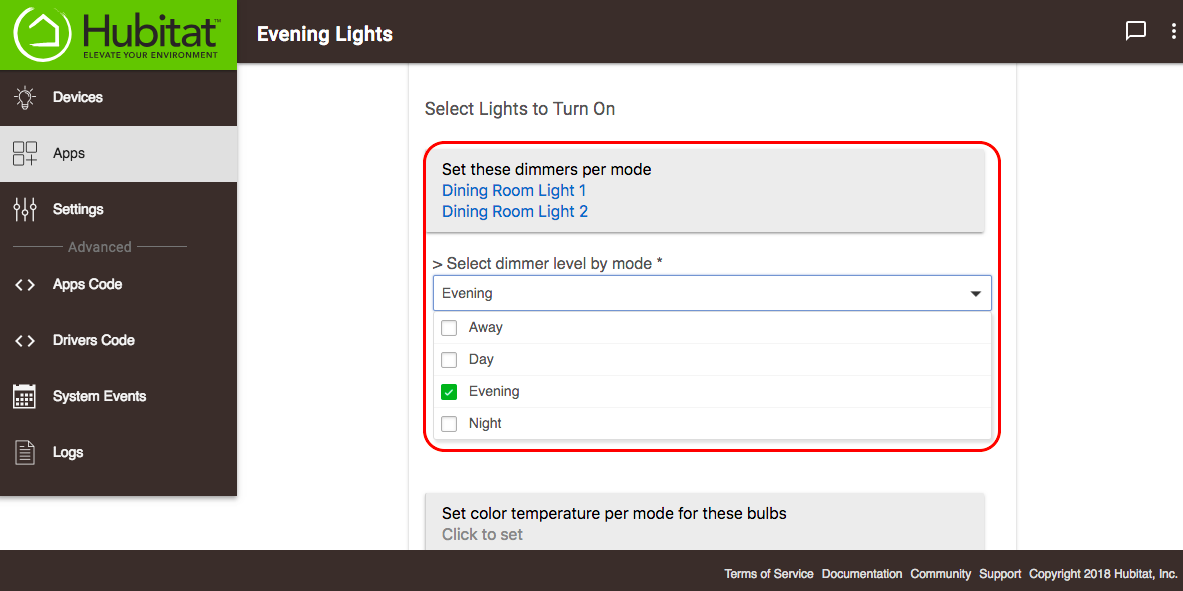
- Set these dimmers per mode: Select the dimmers you want activated, and by which modes. You will also be asked to set the dimmer level.
- Set color temperature per mode for these bulbs: Select the color temperature adjustable bulbs you want triggered, and then choose the modes you want to trigger them. Finally, set the color temperature you want these lights to display for each mode you selected.
- Set color per mode for these bulbs: Select the RGB or RBGW color bulbs you want triggered, and then the modes you want to trigger them. Finally, set the bulb color and level you want these lights to display for each mode you selected.
- Push button per mode: Here you can specify a button per mode you want pushed, when a mode change occurs.
- NOTE: You can specify different buttons per mode, but only within a single button controller.
- Turn on a switches per mode: Select the switches you want to turn on and the modes you would like it triggered. This will turn on whatever light or appliance is activated by the switch.
NOTE: If you are using Mode Lighting to turn lights on in modes where you don't want motion to turn on the lights, you will need to have the switch itself selected in Options for lights off, explained below. If you don't, and you turn your lights off outside of your Mode Lighting child app, then it won't know you did that. It will continue to register them as on, and will execute any adjustments per mode you specified, instead of turning them on to the adjustments per mode you are expecting to happen from an off state. This includes turning lights off via Amazon Alexa or Google Home. You need to specify the same switch Alexa or Google Assistant is using to turn the light off in the Options for lights off.
- When you are satisfied with your chosen options, select Done
¶ Options for lights on
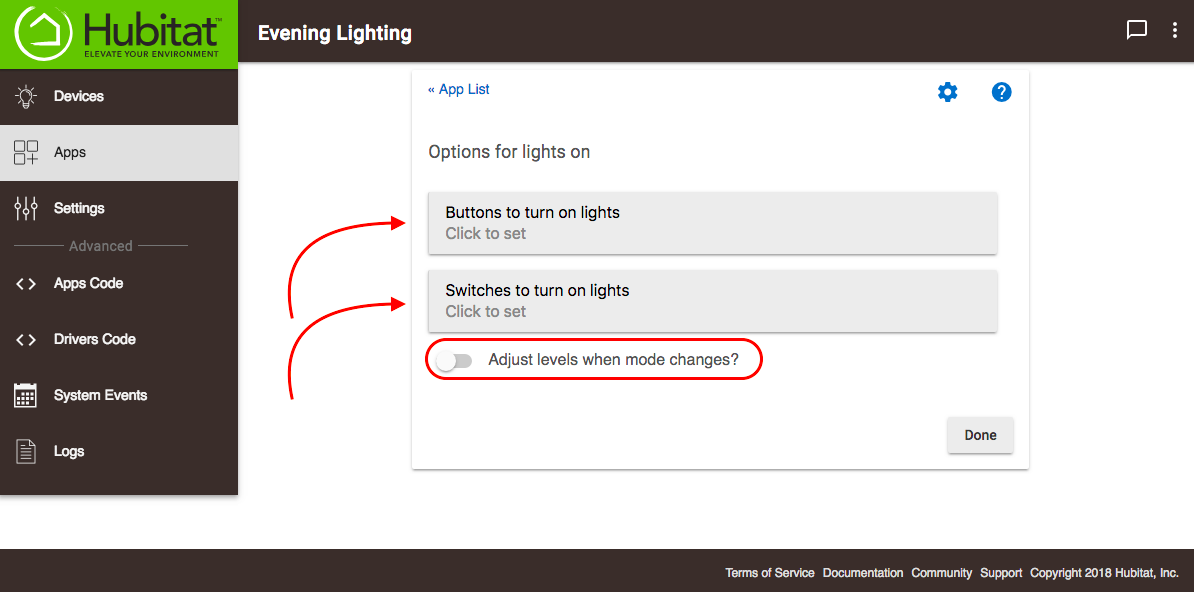
- If you want the option to turn these lights on outside of mode changes, select Options for lights on. Choose buttons and/or switches you want to use to turn on the lights manually.
- If your lights are already on at the time of a mode change, but you want their levels to adjust based on your Mode Lighting app, enable the Adjust levels when mode changes option.
- When you are satisfied with your chosen options, select Done.
¶ Options for lights off
- Choose from the following options for turning lights and switches off, or activating buttons when your mode lighting app turns off the lights. You can also specify buttons and/or switches that can override you mode lighting child app, and immediately turn off lights.
- Additional Switches to Turn Off: Here you can select switches that you’d like turned off when your mode lighting child app is triggered.
- Buttons to Push when turned off: Select any buttons you would like activated when the mode lighting child app turns the lights off.
- Buttons to turn off lights: Select the buttons you would like to use to immediately turn off your lights, overriding your mode lighting settings.
- Switches to turn off lights: Select the switches you would like to use to immediately turn off your lights, overriding your mode lighting settings.
- When you are satisfied with your chosen options, select Done
NOTE: If you are using Mode Lighting to turn lights on in modes where you don't want motion to turn on the lights, you will need to have the switch itself selected in Options for lights off. If you don't, and you turn your lights off outside of your Mode Lighting child app, then it won't know you did that. It will continue to register them as on, and will execute any adjustments per mode you specified, instead of turning them on to the adjustments per mode you are expecting to happen from an off state. This includes turning lights off via Amazon Alexa or Google Home. You need to specify the same switch Alexa or Google Assistant is using to turn the light off in the Options for lights off.
¶ Other Options
- Control with Alexa or Google Home using this name: You can also specify a name you wish to use for control of these lights using Amazon Alexa or Google Home. Select a name that is clear and easy for your voice assistant to understand.
When you are satisfied with your Mode Lighting app, select Done.