¶ Z-Wave Details
Managing your Z-Wave network properly is important to maintaining a solid Z-Wave mesh network. Some of that management can be done here on the Z-Wave Details page. Be sure to read the How to Build a Solid Z-Wave Mesh document for tips on building a robust and resilient Z-Wave network.
This page offers an advanced view of details about your Z-Wave network and Z-Wave devices. It may be useful for troubleshooting; however, most users will not routinely need to use this page. For example, to add a Z-Wave device to your hub, use the Add Device page.
This document describes the Z-Wave Details page on hub models C-7 and newer. Models C-5 and older offer fewer options (e.g., no region selection) and a different device table with less information and no actions, although it can still be useful for setting basic information about all Z-Wave devices on your hub.
The features available on this page are described below:
¶ Z-Wave Enabled/Disabled
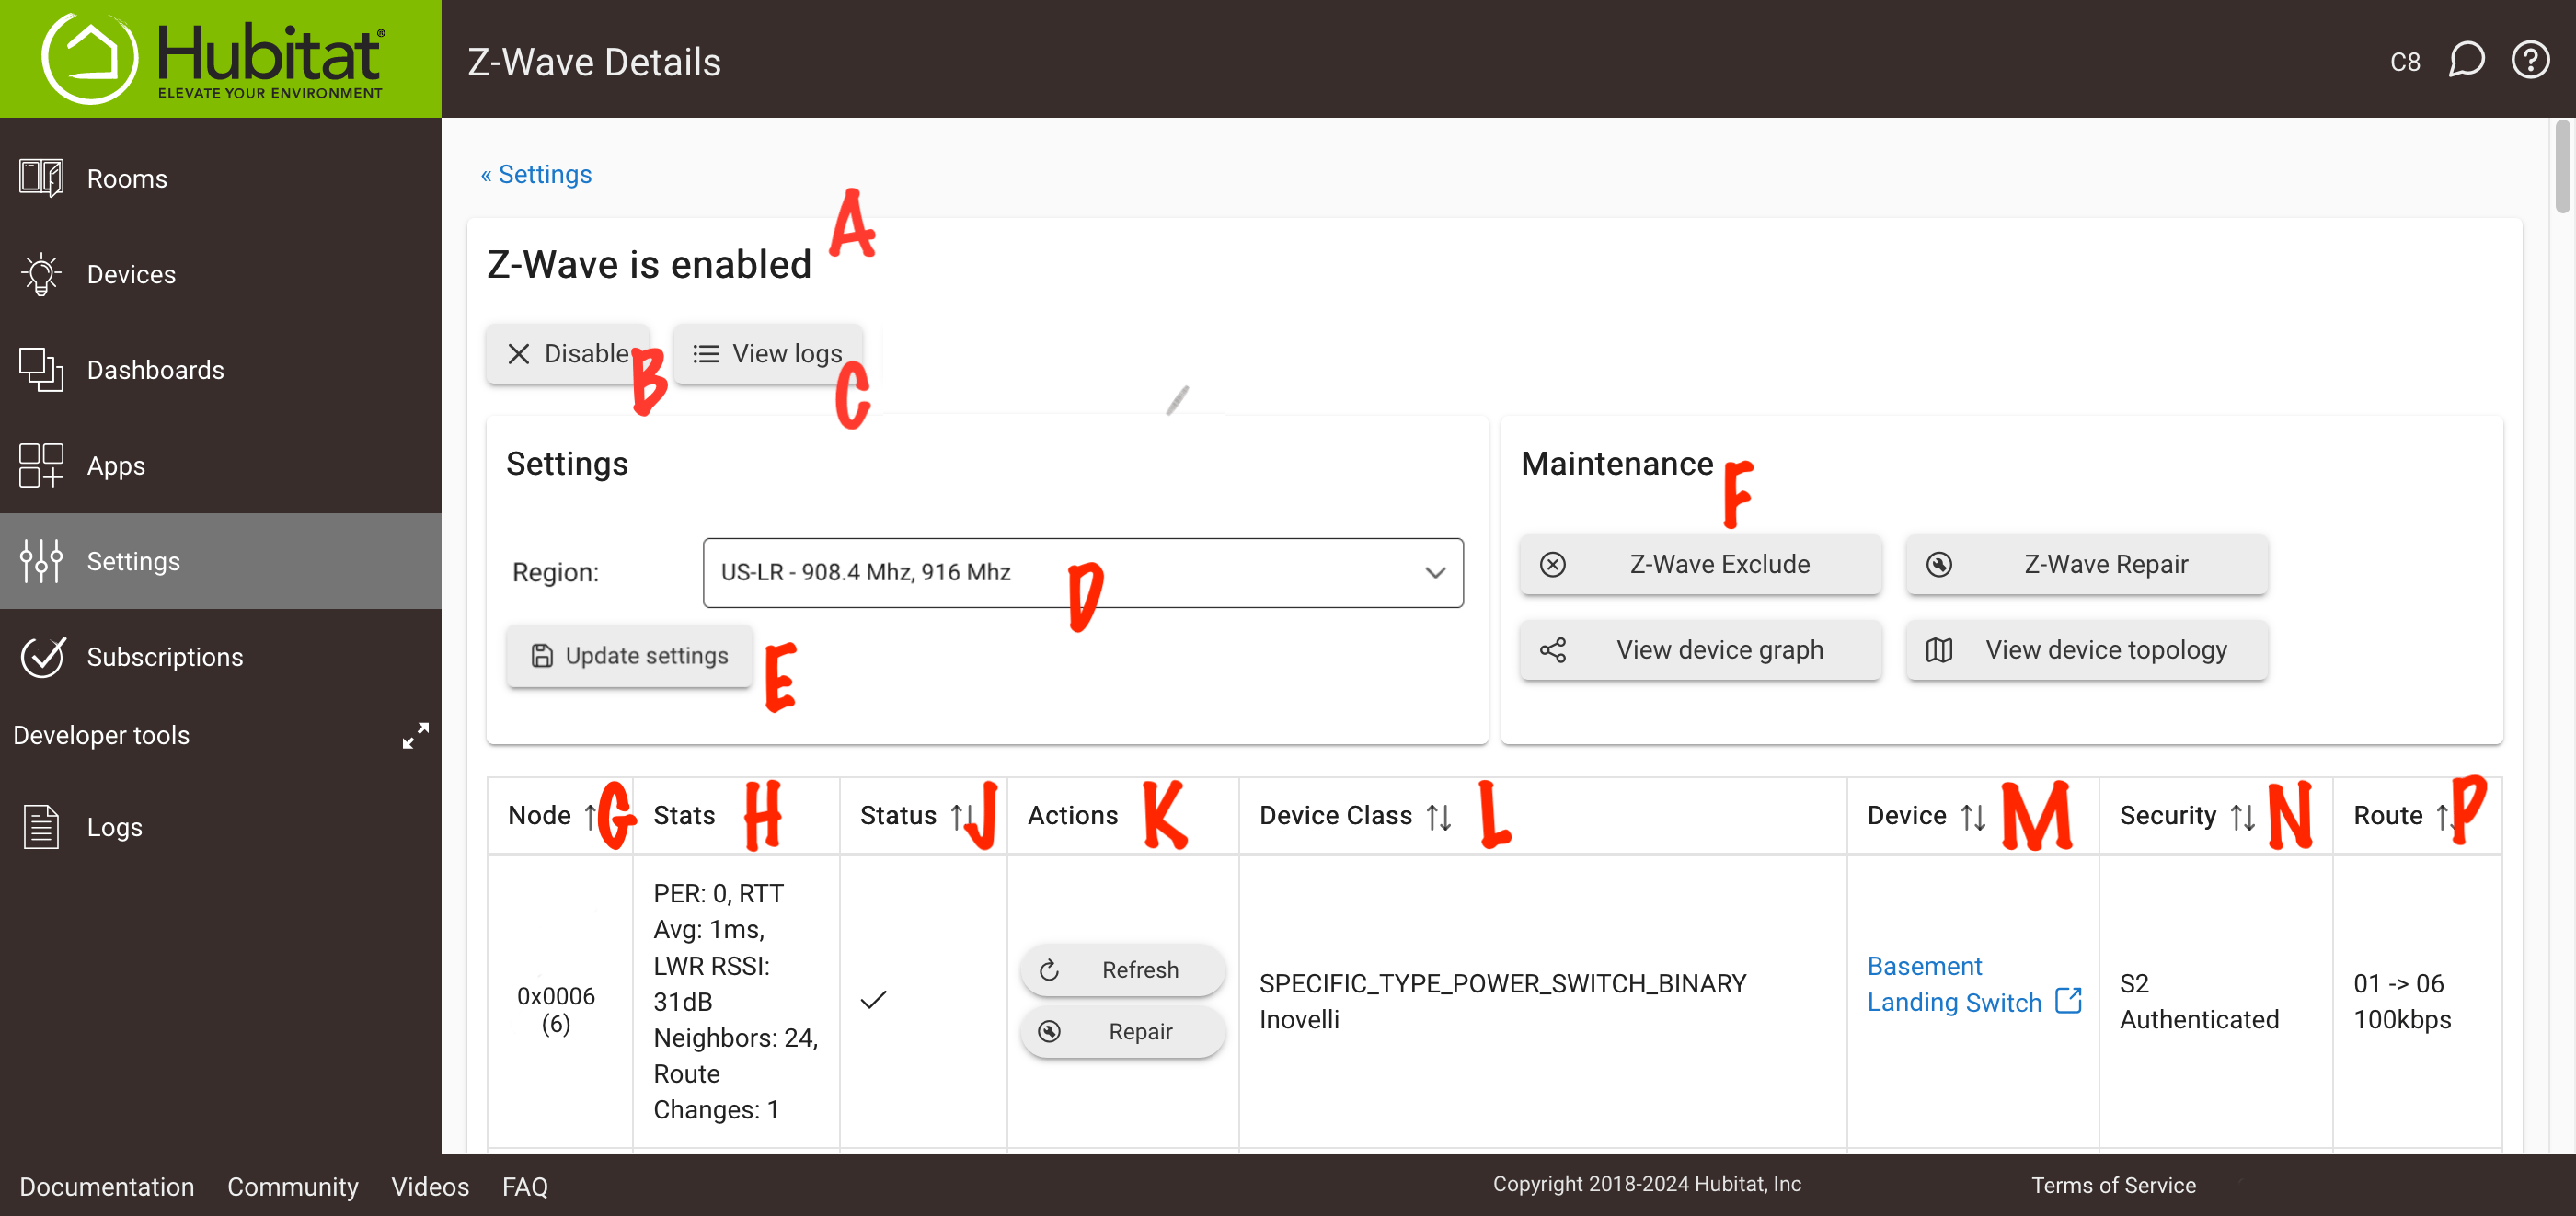
At the top of the page, you will see Z-Wave is enabled (as pictured in A above) or Z-Wave is disabled. If enabled, the remaining options and information will appear.
-
The Disable or Enable button (B): can be used to turn on or off Z-Wave functionality on the hub.
-
The View Logs button (C): allows you to view live logs for routing, signal and channel information. On legacy Z-Wave, the default for all hub models, this shows only Z-Wave packets sent from hub. On models upgraded to Z-Wave JS, more traffic is displayed. In all cases, regular Logs will be more helpful for general device troubleshooting.
Model C-8 Pro users may also see options here to Switch to Z-Wave JS or Switch to legacy Z-Wave (labeled D above). New model C-8 Pro setups will use Z-Wave JS, but existing users can switch if they want. If you switch to Z-Wave JS, you should understand that:
- the hub will need to re-interview all Z-Wave devices after conversion;
- they may not work before this is completed (particularly devices included with security, most notable with battery-powered devices that will not respond until their wake-up interval passes without manual action); and that
- you may wish to switch only if you are trying to troubleshoot a particular problem or enjoy testing new features.
On a new hub (i.e., with no Z-Wave devices), most of the above points are not applicable. Switching before including any Z-Wave devices is easy, and you may consider trying if you enjoy testing new features.
¶ Z-Wave Settings
- Region (E): Use the drop-down menu to set the applicable region for your country and licensed Z-Wave frequency compatible with your devices. Z-Wave LR-capable setups will also have an option to select a specific LR channel if desired (Auto is default and recommended).
Select the Update settings button (F) to save a new region setting.
¶ Z-Wave Maintenance
The Maintenance section (G) offers several features:
-
Z-Wave exclude: Places the hub in general Z-Wave exclusion mode, which can be used to exclude a device previously joined to any hub/controller. (If the device is currently included on this hub, it is recommended to remove the device from the Device Detail page instead.)
-
Rebuild network: Starts a Z-Wave Repair operation on the entire Z-Wave mesh. NOTE: Z-Wave Plus is designed to "self heal" and not require repair. It is generally unnecessary to manually repair Z-Wave Plus devices thanks to explorer frames. However, it can help in specific circumstances to run a repair on a Z-Wave Plus network to reduce the time required to update the neighbor table or when dealing with "classic" Z-Wave devices.
NOTE: Running a Z-Wave Repair or "rebuild network" will not revive failed devices. Z- Wave repair is very network intensive since the hub will attempt to ping and possibly re-route every device (except sleeping nodes).
-
View device graph: View a visual representation of your hub (Z-Wave controller), repeaters, and non-repeater nodes and routes.
-
View device topology: View a map of your Z-Wave network, showing which devices connect through which repeaters and/or directly to the hub.
-
Firmware update: Appears if optional hub Z-Wave radio firmware update is available. This button will be visible only if such an update is available. (This option refers to the hub's built-in Z-Wave radio, not device firmware.)
-
Refresh statistics: Updates data for the Stats column (J) in the device table. On recent platform versions, this data is not updated automatically unless using Z-Wave JS (i.e., not legacy Z-Wave).
-
Antenna test: A diagnostic tool that can be used to diagnose whether the Z-Wave antenna is working properly (typically used only with the guidance of support). To use, select Antenna test, then, when prompted, choose a Z-Wave device to test against and select Start test. The test will run to test RSSI with the antenna connected. Then, disconnect the antenna and select Continue to perform the second half of the test. (The Z-Wave antenna is the one closest to the USB-C port.) When finished, reconnect the antenna. RSSI will generally be notably different between the two tests if the antenna is functioning normally.
NOTE: You may also perform a general Z-Wave exclusion from Devices > Add Device > Z-Wave > Start Z-Wave Exclusion — a handier spot than it may sound given exclusion is a good step to try before trying to include a device. See the Add Device page documentation for more.
¶ Z-Wave Device Table
The Z-Wave Radio Devices table (with columns labeled H through R above) shows a list of your Z-Wave devices with information about them:
- Node (H): Shows Z-Wave node ID in hexadecimal and decimal (e.g., 0x0014 in hexadecimal for node 20)
- Stats (J): Shows signal and selected route information, including:
- PER: Packet error rate (lower is better; 0 is good)
- Neighbors: The number of "neighbor nodes" (nodes in direct wireless range) that this node is able to see
- Route Changes: Number of times the route has changed (fewer is generally better)
- RTT Avg: Round trip time average (the elapsed time between the sending of a packet and the receipt of an acknowledgment packet from the device; shorter is better)
- LWR RSSI: Calculated value of the RSSI (relative signal strength index) for the last working route (LWR) over each hop, compared to the background noise sampling (higher values above 0 are better)
- NOTE: Neighbor and route statistics are not applicable to and values will not be displayed for Z-Wave LR devices (nodes marked with "LR" in the "Node" column, or node IDs including and greater than 0x0100)
- Status (K): Shows a device status (health) as reported by the Z-Wave SDK. Normal (OK) status is indicated by a checkmark. Other possibilities are Pending, Failed, or Unknown. Status besides OK do not necessarily indicate a problem.
- Actions (L): Offers several options:
- Refresh will attempt to ping the device.
- Rebuild route will attempt a per-node Z-Wave repair (usually not necessary but preferred over a full network repair if needed).
- If Replace is offered, will initiate a Z-Wave Replace operation where the existing node can be replaced with a new node (include like a regular device; the selected node ID will be re-used for the new device, effectively replacing the old device with the new device from a Z-Wave perspective). If Replace is not offered but you believe the node is dead, attempt a Refresh once or twice; if Repair does not appear, the node is likely OK and the hub was able to hear back from it, and you will be unable to Replace.
- The Discover button will create a Hubitat device (column N) for this Z-Wave node if none exists; the button will not appear if a device already exists.
- State: (Z-Wave JS only) Shows complete node state information, including endpoints, command classes and versions, and last reported data; may be useful for development or troubleshooting (developers may call
zwave.getStoredValues()to retrieve)
- Device Class (M): Shows the Z-Wave specific or generic device class and manufacturer
- Device (N): Provides a link to the Hubitat device corresponding to this Z-Wave node (typically created automatically after successful inclusion; if one does not exist, try Discover to create one)
- Security (O): Shows the highest Z-Wave security type granted during inclusion: S2 Access Control, S2 Authenticated, S2 Unauthenticated, S0, or None
- Route (P): Shows the hops the Z-Wave signal takes from the hub to the device (using hexadecimal node IDs) and the speed of the link
- Msgs (Q): Shows number of messages sent by the device since the last reboot
- Last Message (R): Date and time of last message from the device