¶ Rooms
The Rooms feature is accessible from the Rooms link on the sidebar of the hub interface. Rooms provides a simple way to categorize any number of devices into different rooms, generally intended to correspond to actual rooms in your home. While entirely optional to configure, adding devices on your hubs to Rooms allows you to:
- see devices sorted by room on the home page of your hub, allowing an easy, organized way to view device statuses and navigate to device detail pages directly from this page
- use the Rooms page itself to see devices sorted by room, according to your categories — as opposed to the Devices page with everything in one list
- see devices sorted by room in the Devices tab of the Hubitat mobile app (if the device type is supported by this feature; only switches, bulbs, dimmers, and similar devices are at the moment) — this is sort of a simple Dashboard alternative that requires minimal setup
- allow some apps, including Room Lighting, to make intelligent guesses about default configuration based on what devices you have in a room
¶ Interface
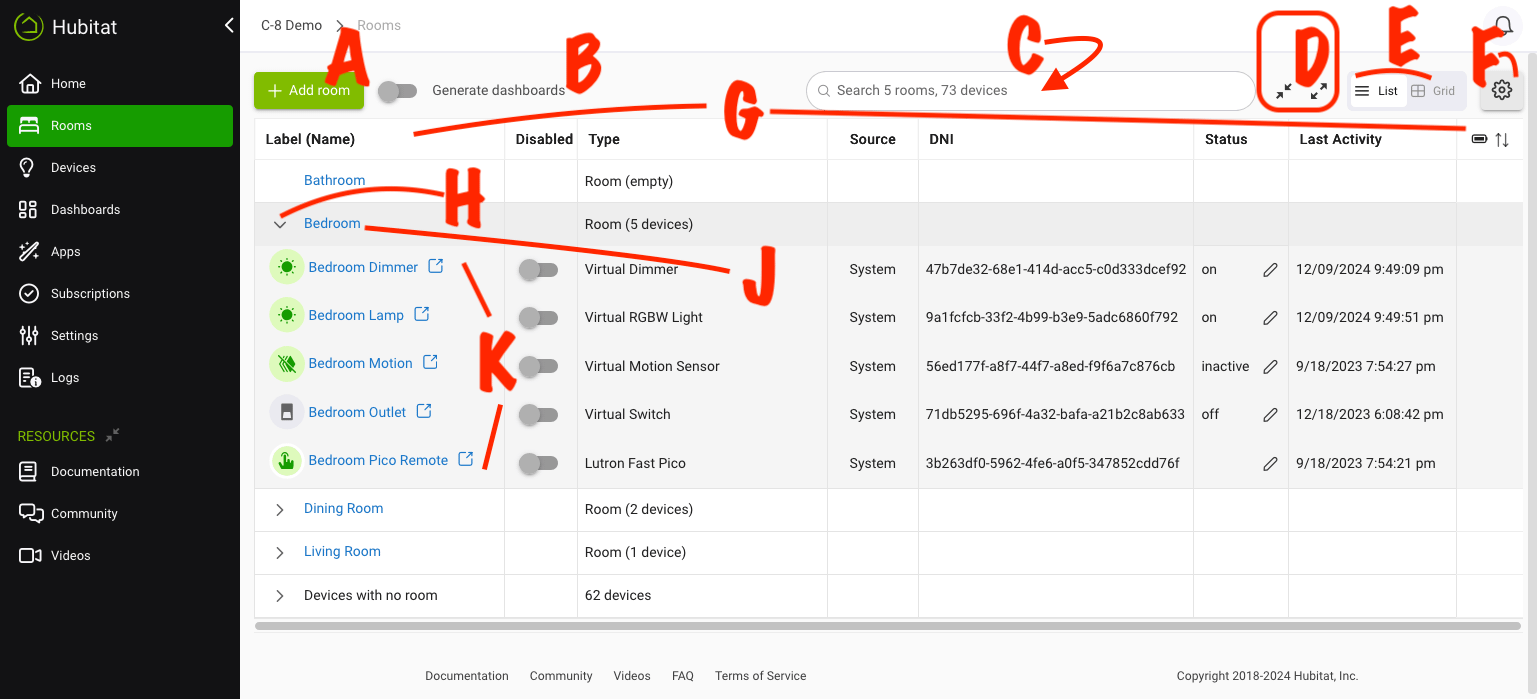
The Rooms page lists existing rooms, shows devices in those rooms, allows creating new rooms, and offers several options for how the page is displayed:

- The Add Room button (A) allows adding a room to this list
- The Generate dashboards option (B) will automatically create an Easy Dashboard for each room (containing devices in that room; this dashboard will automatically add and remove devices as devices are added and removed from the room; disabling this option will remove all such automatically generated dashboards)
- The search box (C) allows you to filter the list of devices based on search terms (additionally, rooms without matching devices will be hidden from display). Tip: Use the "X" button inside the search box as an easy way to clear search text when present.
- The list view (pictured) or grid view icon (C) allows you to switch between list view (pictured) or grid view. The difference is similar to the same views on the Devices and Apps pages
- The collapse and expand icons (D) expand or collapse all rooms, showing or hiding all devices contained in that room
- The list/grid selector (E) toggles between the table-like list view (pictured) or grid view. List view offers the ability to display more information; grid view may work better on touchscreens or for a more dashboard-style view
- The display settings icon (F) allows you to configure the display of the list view, including hiding or showing certain columns. This setting is only available in list view. Options include showing the device ID (numeric ID assigned by hub when adding the device, useful for Maker API and similar apps), the "Status" column (attribute value to display, e.g., switch on or off, as a summary of the device state on this page or the Devices page), the "device status configuration" option that shows a pencil icon next to this value in the table to provide an easy way to change which attribute is selected, and more.
The values displayed in the list (table) or grid view are generally similar to those on the Devices page.
¶ Room Details
Selecting the room name, for example, Bedroom, will allow you to edit room details. The room details sheet allows editing the name of the room and adding or removing devices from the room. (Previous platform versions allowed adding a picture of the room, reserved for potential future use; this feature is no longer available and was never used for any purpose.)
You do not need to go to the Rooms page or the room detail page to assign a device to a room. Other ways a device can be assigned to a room include:
- assigning a device to a room directly from its device detail page
- you will also be prompted to choose a room when adding a new device to your hub (but if you skip this option, you can assign a room later using any of the above options)